
This page walks through turning a product into a 3D configurator, from the model file to something a customer can rotate.
Before you start
You need a glTF model (.glb or .gltf) in which the configurable parts are separate, named objects. Choices are bound to objects inside the model by name, so a model exported as one merged mesh cannot be configured — the parts have to be distinguishable.
It is worth getting this right before you build anything in WordPress. Re-exporting a model later means redoing the links.
1. Switch the product to 3D
- Edit the product,
- Open the Configurator tab in the Product data panel,
- Set Configurator type to 3D configurator,
- Press Start product's configurator.
The sidebar now includes two sections that a 2D configurator does not have: 3D Objects and 3D settings.
2. Add the model
- Go to 3D Objects,
- Press Add 3D item,
- Choose Gltf/glb model,
- Give it a Label — this is for you, not the customer,
- Press Select model and choose the file from the media library.
The model appears in the preview. If nothing appears, the file either failed to load or the camera is not pointing at it — the camera is dealt with in step 5.
3. Light the scene
A model with no lighting renders black. You have two ways to light it, and most setups use both:
- An Environment — an HDRI or a cubemap. This lights the model realistically and provides reflections. It is the fastest way to get a good result. An environment is selected by default.
- Lights — Ambient, Directional, Point, Spot, Rect Area or Hemisphere, added individually and positioned by hand. Use these for control, or to add a highlight the environment does not give you.
Both are added the same way, through Add 3D item.
4. Bind choices to the model
This is the step that makes it a configurator rather than a model viewer.
Layers and choices gain a 3D model setting and an Object in the model setting. The first points them at a model; the second, optionally, at one named object inside it. Choices inherit both from their layer unless they set their own. What a choice does to that object — show it, hide it, change its material, move it — is what the customer sees when they pick it.
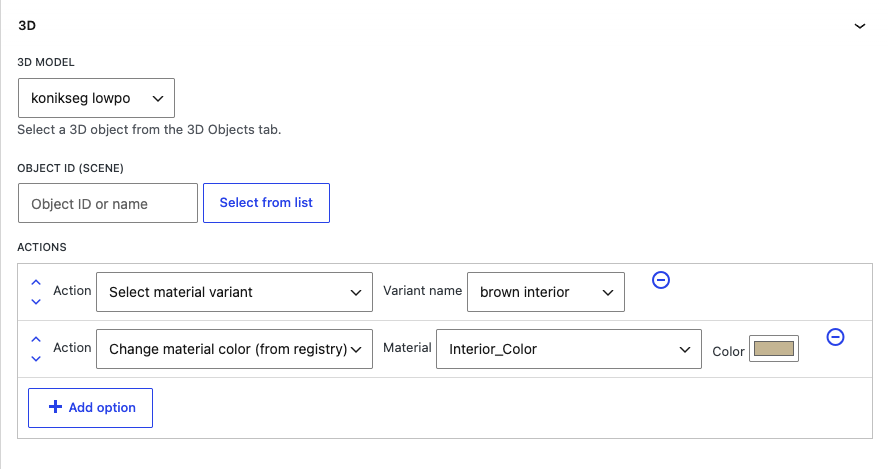
With the 3D Premium add-on, a choice can also move a part onto an anchor, such as handlebars that sit higher on a bigger frame. See Positions, anchors and layouts.
Showing a part with conditional logic. To show a part only in some configurations (for example the hooks a basket hangs on), add a layer, turn on This layer does not have choices, and set its 3D model and Object in the model to that part. The object is shown while the layer is shown, so use conditional logic to show the layer when the part should appear. When several such layers display the same object, it is shown while any of them is shown. On layers that have choices, hiding the layer never hides its object: those layers configure the part rather than display it.
5. Set the camera positions
Go to 3D settings > Camera positions (views).
Add the angles you want in the configurator's Views section, as in a 2D configurator. Then, for each one, pick it under Saved views, rotate the preview to where it should look from, and press Set current view to selected angle. These become the views the customer can jump between.
On each angle, Camera focus (objects for framing) accepts several objects. The camera frames those when that view is active, so the customer is looking at the right part of the product.
If your model file already contains cameras, Import cameras from GLTF brings them in as angles rather than making you recreate them by hand.
The same section controls how far the customer may move the camera: Rotation limits for the vertical and horizontal angles, and Zoom limits for how close and how far they can zoom.
6. Tune the look
These sections under 3D settings decide how the result actually looks:
- Environment — environment source, intensity, rotation and blur.
- Background — transparent or a solid colour.
- Shadows — no shadow, a fake shadow, or real-time shadows.
- Display — loading poster, orbit hint and objects to hide.
- Renderer / Output — tone mapping, exposure and alpha output.
Every setting is described in 3D settings.
If you change nothing else, set Tone mapping to Filmic (ACES) and adjust Exposure until the product reads well. That pair does more for the result than any other setting.
7. Save
Press save in the sidebar footer. As with a 2D configurator, nothing is written to the product until you do.
If something looks wrong
- Black model — no lighting. Add an environment.
- Blown-out white areas — exposure too high, or tone mapping set to None or Linear. Filmic (ACES) rolls highlights off smoothly instead of clipping them.
- Nothing visible — the camera may be inside or behind the model. Set a camera position, or import one from the file.
- A choice does nothing — the layer or choice is probably not bound to an object, or is bound to a name that no longer exists after a re-export.